Create & Edit / Company Screens
Adding and Editing the companies information in Wise-Sync is simple just follow refer to the 5 setup tabs sections to create or update the sync settings for your Xero organisation.
Step 2: Configure your Wise-Sync > Xero Company
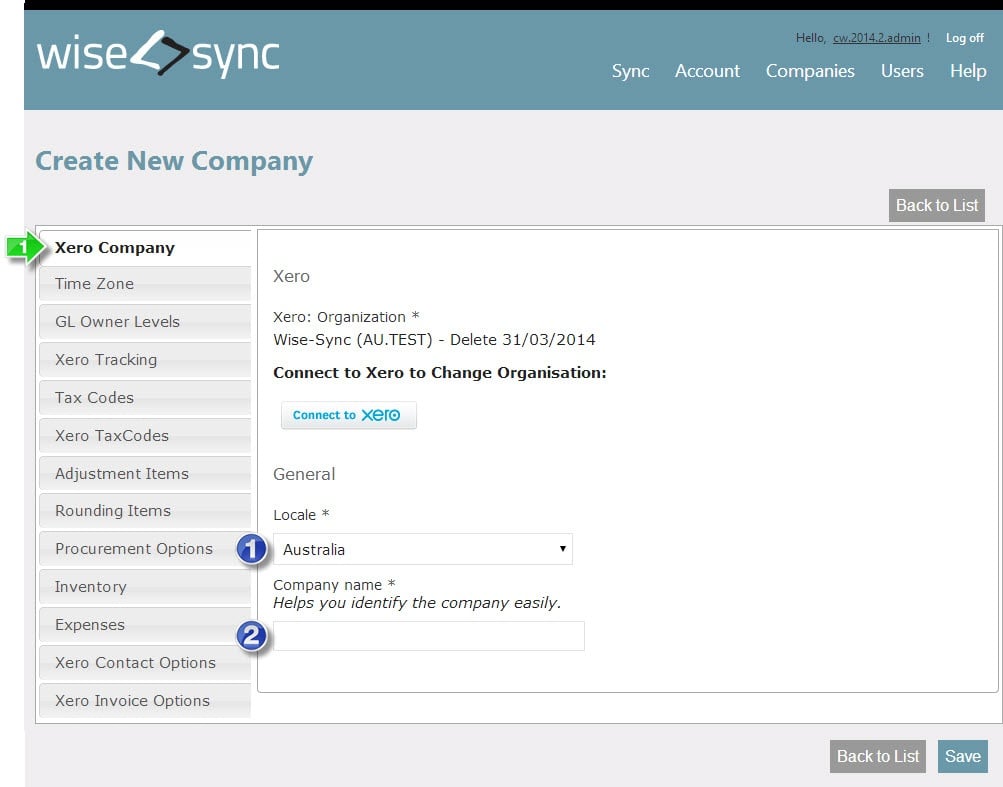
Once you have selected your organisation in xero, you will be returned to this page to update the following information steps.
Xero Company
Company Locale
Select the locale for your taxation system, this will define the tax codes which are available to select from in the next screens.
Note: This option is only visible when the company is being created, and cannot be changed.
Company Name
Select the locale for your taxation system, this will define the tax codes which are available to select from in the next screens.
Time Zone
Timezone Offset
Enter the Timezone of where your ConnectWise server is located. This is required to ensure that the "Get Unposted Transactions" returns results based on your location.
GL Owner Levels
ConnectWise: Owner Level
Enter your connectwise billing location (Office) here, refer to the Accounting Interface for the exact string that you need to enter here.
To add additional GL Owner Levels to sync to this Xero Company, press the "+" Icon.
Note: Default to bill all locations is to leave this field Blank
Xero Tracking
Enable Tracking Categories
If you have the Wise-Sync option to Enable Tracking Categories, select this option if you Tracking is enabled in this Xero Organisation.
Tax Codes
Taxable Sales / Purchases
Select the appropriate tax code for your locale for Taxable Sales and Purchases.
Tax Exempt Sales / Purchases
Select the appropriate tax code for your locale for Tax Exempt Sales and Purchases.
Adjustment Items
Wise-Sync Adjustment Items
Enter the Following information:
- Adjustment Item Code: Will be used for the Item when Rounding lines are created on an invoice.
- Adjustment Item Sales Account: The Account to Post Revenue to.
We suggest that you use a general Sales Account, such as "All other Revenue"- Adjustment Item Sales Tax: The Sales Tax Code
- Adjustment Item Purchase Account: The Account to Post Expense to.
We suggest that you use a general Sales Account, such as "All other Cost of Goods Sold"- Adjustment Item Purchase Tax: The Purchases Tax Code
- Limit Adjustment Amount: Rounding Limit (Default 10, Set to 0 to disable).
Rounding Items
Wise-Sync Rounding Items
Enter the Following information:
- Rounding Item Code: Will be used for the Item when Rounding lines are created on an invoice.
- Rounding Item Sales Account: The Account to Post Revenue to.
We suggest that you use a general Sales Account, such as "All other Revenue"- Rounding Item Sales Tax: The Sales Tax Code
- Rounding Item Purchase Account: The Account to Post Expense to.
We suggest that you use a general Sales Account, such as "All other Cost of Goods Sold"- Rounding Item Purchase Tax: The Purchases Tax Code
- Limit Rounding Amount: Rounding Limit (Default 10, Set to 0 to disable).
Procurement Options
Part-Ship Purchase Orders
Select if you wish to receive part-shipments on a purchase order. When disabled, purchase orders will only be able to be posted as a single Xero Invoice.
Vendor Invoice Date Source
Select the date source for the Xero Purchase Invoice. Default is the Purchase Order date if no other option is selected.
When the selected option is not updated in a Purchase Order, the default date will revert to the Purchase Order Date.
More Information > Selecting Alternate Purchase Order Invoice Dates
Inventory
Enable COGS Inventory Posting
Select to Enable Advanced Features for Inventory Posting.
More Information > Setup ConnectWise Inventory
Expenses
Expense Tax Entry (Tax Inclusive / Exclusive)
Select when expenses are entered into ConnectWise as Inclusive of any Tax.
Expense Tax Code
Default Expense Tax Code applied to Expenses
Expense Grouping (Member ID)*
Select to Group Expenses by Week for Each Member.
Save Reimbursable Expenses as Option:
Select to Save Expense Bills as a Draft or Approved Bill.
Save Company Paid Expenses as Option:
Select to Save Expense Bills paid by a Company Account as
> Offset Account (Paid Bill) - Bill will be created, but total will be cleared to nominated Offset Account
> Draft Bill - Bill will be created in Draft Status
> Approved Bill - Bill will be created in Approved Status
Default Offset Xero Account:
Enter the account where Offset transactions should be posted (only applicable if Offset Account - Paid Bill option is selected).
Default Offset Xero Item Code:
Enter your preferred default code for Offset Transactions.
Company personal expense Xero Account:
Enter where Personal Transactions (reimbursable by member) are to be posted.
* Options on this tab will only be present if you are subscribed to a plan that includes Enhanced Expense Sync.
More Information > Pre-Setup ConnectWise Expenses > Overview
Xero Contact Options
Append Account name to Company Name
Select if you wish to append the Company Account Number to the company name in Xero.
Xero Invoice Options
Show Unit of Measure
Select if you wish to append the "Unit of Measure" to Sales invoices in Xero.